
Table of Contents
How to Screen Record on Mac: How to Start and Stop Screen Recordings
screen record on mac with audio,how to screen record on macbook air,how to screen record on mac shortcut,how to screen record on mac for youtube,how to stop screen recording on mac, how to screen record on mac without quicktime,how to screen record on mac with camera,how to screen record on mac 2021,screen record on mac with audio,how to screen record on mac for youtube,how to screen record on macbook air,how to screen record on mac shortcut,how to stop screen recording on mac,how to screen record on mac 2021
Are you interested in learning how to start and stop recording your Mac’s screen? We’ve got you covered with a variety of strategies that you can employ without spending any money.
Recording the display on your Mac can be quite helpful in a wide variety of situations. You might wish to make a screencast instruction for others to follow. Possibly, you are putting together a presentation for a business. Alternatively, you might be interested in creating video notes for your own use.
Regardless of the motivation, carrying it out is uncomplicated and straightforward. The following is an explanation of how to record your Mac’s screen and how to quickly begin and end recordings using a variety of different approaches.
How to Screen Record on a Mac Using the Screenshot Utility
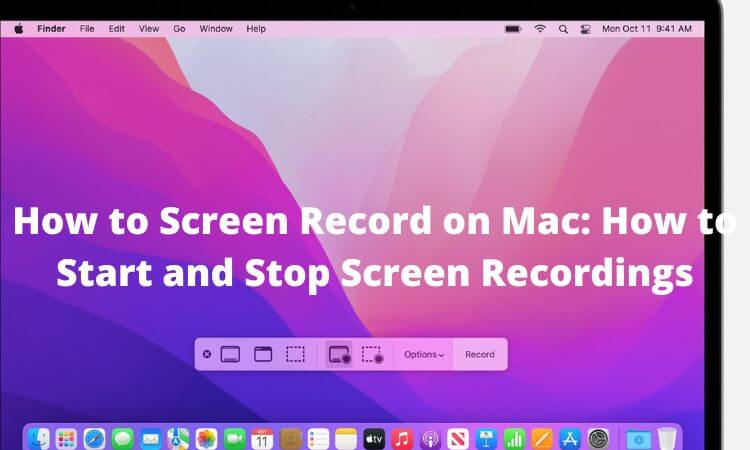
It’s possible that you’ll be tempted to download and install third-party screen recorders on your Mac, but the Screenshot Utility is actually the simplest and most straightforward way to capture the display on your Mac. In addition to taking screenshots, this program enables you to record screen activity as well.
On your keyboard, you’ll need to hit Cmd + Shift + 5 in order to launch the utility. You will find two recording options at the bottom of the window that displays. These options are Record Selected Portion and Record Entire Screen.
If you select Record Entire Screen, a picture of a camera will show on the screen. If you have more than one monitor, this will come in handy for you. Simply move the camera to the part of the screen you wish to record, and then click the button to start the video. If you select Record Selected Portion, you can alter the frame size by dragging the corners of the box that appears on the screen. You also have the option of moving the box to a new location on the screen.
DO NOT MISS: The Best Dark Web Websites You Won’t Find on Google 2022
You will be able to select several options for your Mac screen recording after clicking on the Options button. This includes selecting the microphone you want to use, deciding where you want to keep your recording, deciding whether or not you want to capture mouse clicks and a number of other options. To begin the recording, when you are ready to do so, press the Record button on your device.
How to Stop Screen Recording on Your Mac
As soon as the recording is over, you won’t be able to see the window for the screenshot program, so you might not know how to stop the recording when it’s finished. Instead, you should see a little icon that looks like a stop sign in the menu bar of macOS. Simply clicking on it will put an end to the screen recording that is taking place on your Mac.
You can also stop the recording by pressing Cmd + Control + Esc on your keyboard. You also have the option to press Command + Shift + 5, which will bring up the screenshot bar and give you the choice to stop recording.
The recording will be saved to your Desktop without your intervention, and a preview of it will appear in the lower-right-hand corner of your screen (similar to when you take a screenshot). If you click on this preview, you will be able to view the full recording and cut it down to the desired length, if necessary.
The Benefits of Recording With the Screenshot Utility
Since the screenshot application has been a part of macOS ever since the release of macOS Mojave, using it is completely free and does not require the installation of an additional screen recorder.
Additional features include an integrated microphone for recording audio, a timer for making timed recordings, and the capability to display mouse clicks for usage in lessons.
You are able to immediately use AirPlay or the sharing options from within the video that you have captured.
YOU MAY LIKE THIS: Do AirPods Work With Android: What to Expect
How to Screen Record on a Mac Using QuickTime Player
Utilizing QuickTime Player is just another technique that can be utilized to capture the display of your Mac. The Screenshot utility tool that we explained earlier is used by QuickTime Player as well; the only difference is that rather than controlling everything through the Screenshot utility tool, you do so straight from the QuickTime Player app itself. Macs that are running an earlier version of macOS than macOS Mojave could benefit from this feature.
Launch the QuickTime Player application, and from the top menu, bar click “File” > “New Screen Recording” to begin recording using the software.
This will launch an overlay that provides you with a variety of options to choose from when recording your screen. In a manner analogous to that of the Screenshot function, you have the option to either Record the Entire Screen or Record a Selected Portion.
After you have finished setting up everything, you can begin recording by clicking the Record button. You can halt the recording of your screen on your Mac by selecting the Stop icon from the menu bar in macOS.
The recorded video will start playing as soon as it’s ready. You have the option to change it to meet the requirements (using Trim or Rotate tools). When you are finished, go to the File menu and select Save or press the Cmd key together with the S key on your keyboard to save the movie to the location of your choosing.
The Benefits of Screen Recording With QuickTime Player
Since QuickTime Player is already pre-installed on your Mac, you won’t need to pay any more fees or go through any further installation steps.
Additional functionality, such as simple video editing and audio recording, are available through the use of QuickTime Player.
You are able to immediately use AirPlay or the sharing options from within the video that you have captured.
Macs that are running older versions of macOS have QuickTime Player installed by default.
How to Record System Audio in Screen Recordings
You can only record the audio using a microphone if you choose either of the two options that were just shown to you. This comes in useful if you want to record a voice-over or a podcast, but it is not an effective method if you want to record the audio coming from the system. The good news is that there is a workaround available, which entails installing a free audio driver on your Mac in order to record system audio while you are filming screencasts.
How to Screen Record on a Mac With Third-Party Apps
If you want or need additional features, the only reason to look for a third-party app to record what’s happening on your Mac screen is if you don’t want to use the first two options. If you are not content with the choices that come pre-installed on your Mac, OBS Studio is the free third-party software that we recommend you use to record the screen of your computer instead.
OBS Studio
There is no other freeware screen recording software that is considered to be on par with OBS Studio’s quality since this is the general consensus among both casual and dedicated users. The application provides features suited for both inexperienced and experienced users, allowing you to personalize every facet of the screen recording you create. You can stream straight to many platforms using the built-in features of the app, including YouTube, Facebook, Twitch, and others.
Conclusion
In the past, it was more difficult to begin and end a screen recording on your Mac. But as you can see, it’s not too difficult to accomplish in today’s world. If you wish to record your screen using a Mac, you have a number of built-in choices accessible to you, and if you want, you may also make use of an application that was not developed by Apple. It is my hope that one of these approaches will provide you with the capability to record the display of your Mac.